1. Cảm biến nhiệt độ DS18B20
Chuẩn giao tiếp One Wire
(Nguồn tham khảo: https://vi.wikipedia.org/wiki/1-Wire)
DS18B20
(Nguồn tham khảo: http://codientu.org/threads/5207/)
DS18B20 là IC cảm biến nhiệt độ, chỉ bao gồm 3 chân, đóng gói dạng TO-92 3 chân nhỏ gọn.
Đặc điểm chính của DS18B20 như sau:
-
Lấy nhiệt độ theo giao thức 1 dây (1wire)
-
Cung cấp nhiệt độ với độ phân giải config 9,10,11,12 bit, tùy theo sử dụng. Trong trường hợp không config thì nó tự động ở chế độ 12 bit. Thời gian chuyển đổi nhiệt độ tối đa là 750ms cho mã hóa 12 bit
+Có thể đo nhiệt độ trong khoảng -55 -> +125°C. Với khoảng nhiệt độ là -10°C to +85°C thì độ chính xác ±0.5°C,±0.25°C ,±0.125°C,±0.0625°C. theo số bít config.
-
Có chức năng cảnh báo nhiệt khi nhiệt độ vượt ngưỡng cho phép. Người dùng có thể lập trình chức năng này cho DS18B20. Bộ nhớ nhiệt độ cảnh báo không bị mất khi mất nguồn vì nó có một mã định danh duy nhất 64 bit chứa trong bộ nhớ ROM trên chip (on chip), giá trị nhị phân được khắc bằng tia laze.
-
Cảm biến nhiệt độ DS18B20 có mã nhận diện lên đến 64-bit, vì vậy bạn có thể kiểm tra nhiệt độ với nhiều IC DS18B20 mà chỉ dùng 1 dây dẫn duy nhất để giao tiếp với các IC này. Với DS18B20 bạn hoàn toàn có thể tạo cho mình mạch cảm biến nhiệt độ theo ý muốn.
-
Điện áp sử dụng : 3 – 5.5 V
-
Dòng tiêu thụ tại chế độ nghỉ rất nhỏ.
2. Thư viện DS18B20 cho VBLUno51
Trên Adruino, để bo mạch VBLUno51 điều khiển, đọc giá trị nhiệt độ từ cảm biến DS18B20, ta cần sử dụng các thư viện sau:
OneWire
-
Thư viện mức thấp, hỗ trợ vi điều khiển giao tiếp với các IC qua chuẩn OneWire
-
Download tại đây https://github.com/VNGIoTLab/OneWire
-
Đã sửa để làm việc tốt trên các bo mạch VBLUno của VNG
Arduino-Temperature-Control-Library
-
Download tại đây https://github.com/milesburton/Arduino-Temperature-Control-Library
-
Có sử dụng thư viện OneWire làm thư viện cơ sở
Các thư viện hiển thị lên màn hình OLED
- Tham khảo tại Tutorial 7 dành cho Arduino trên mạch VBLUno51
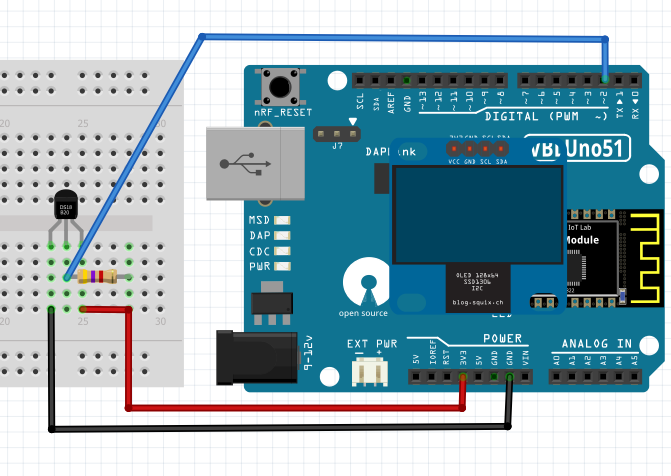
3. Kết nối phần cứng
| TT | Chân của DS18B20 | Kết nối với mạch VBLUno51 |
|---|---|---|
| 1 | GND | GND |
| 2 | DQ | D2 |
| 3 | VDD | +3.3V |
Mắc một điện trở 4.7KOhm giữa DQ(2) và VDD(3).
4. Mã nguồn
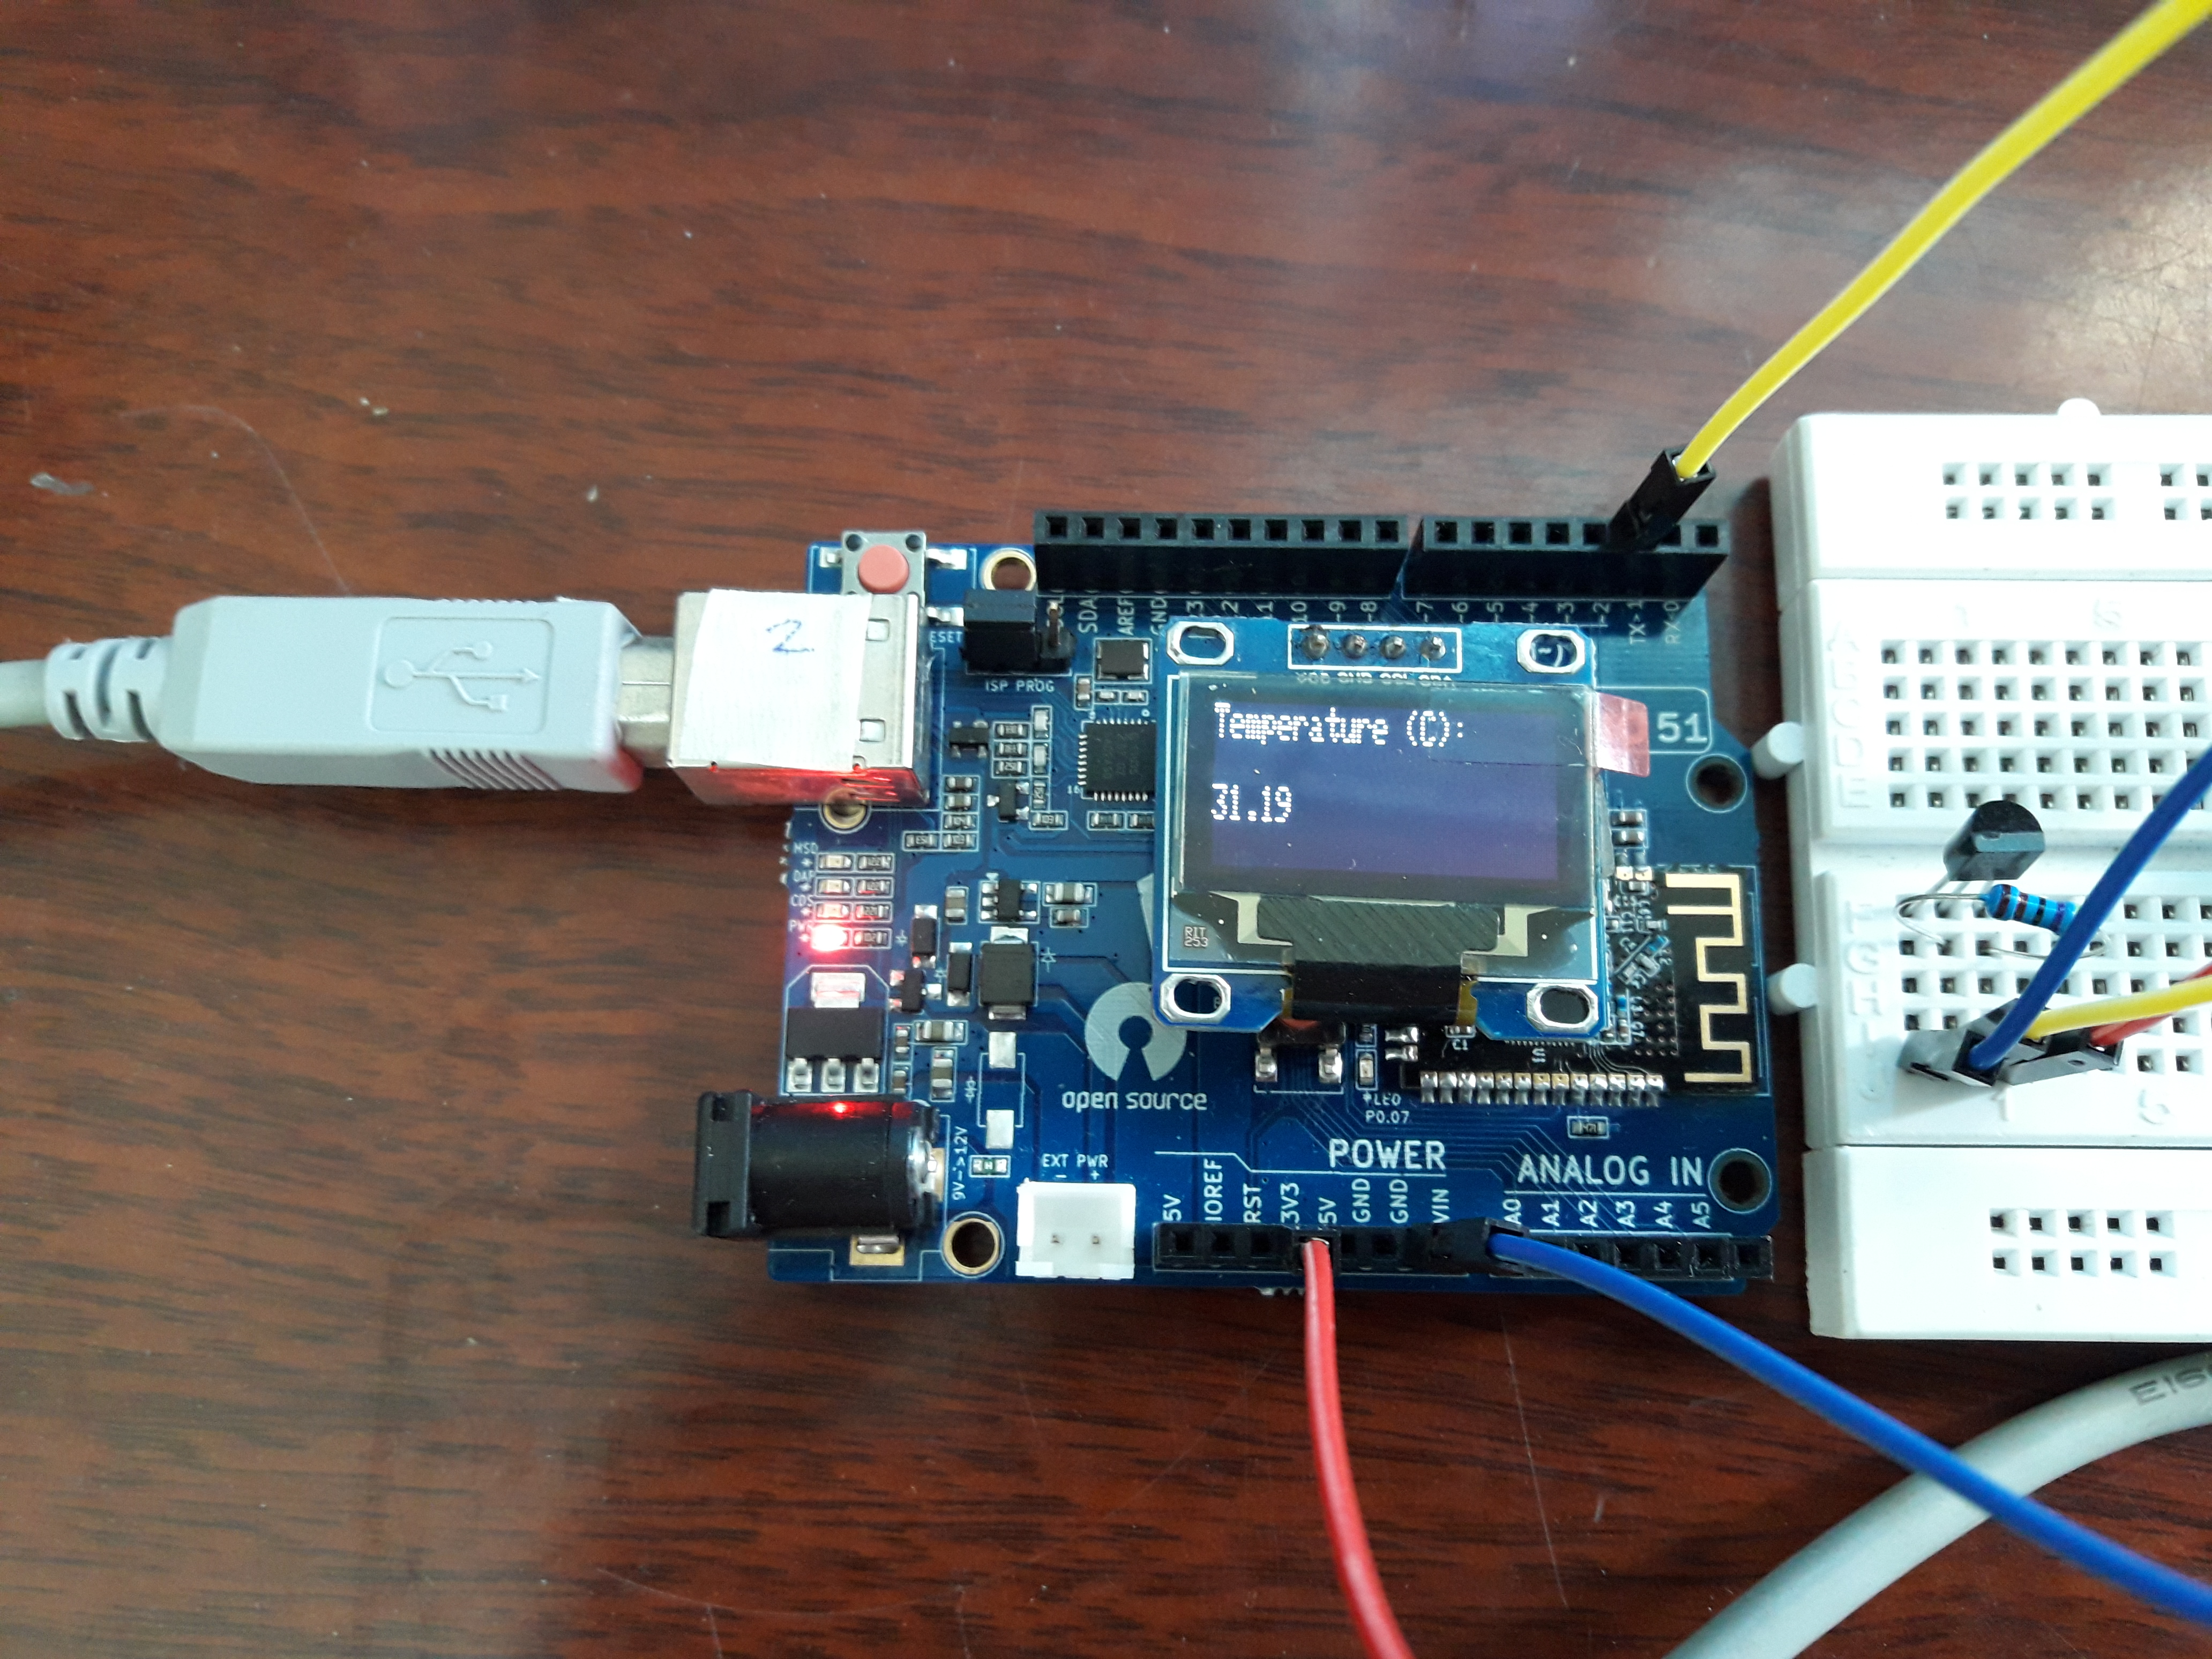
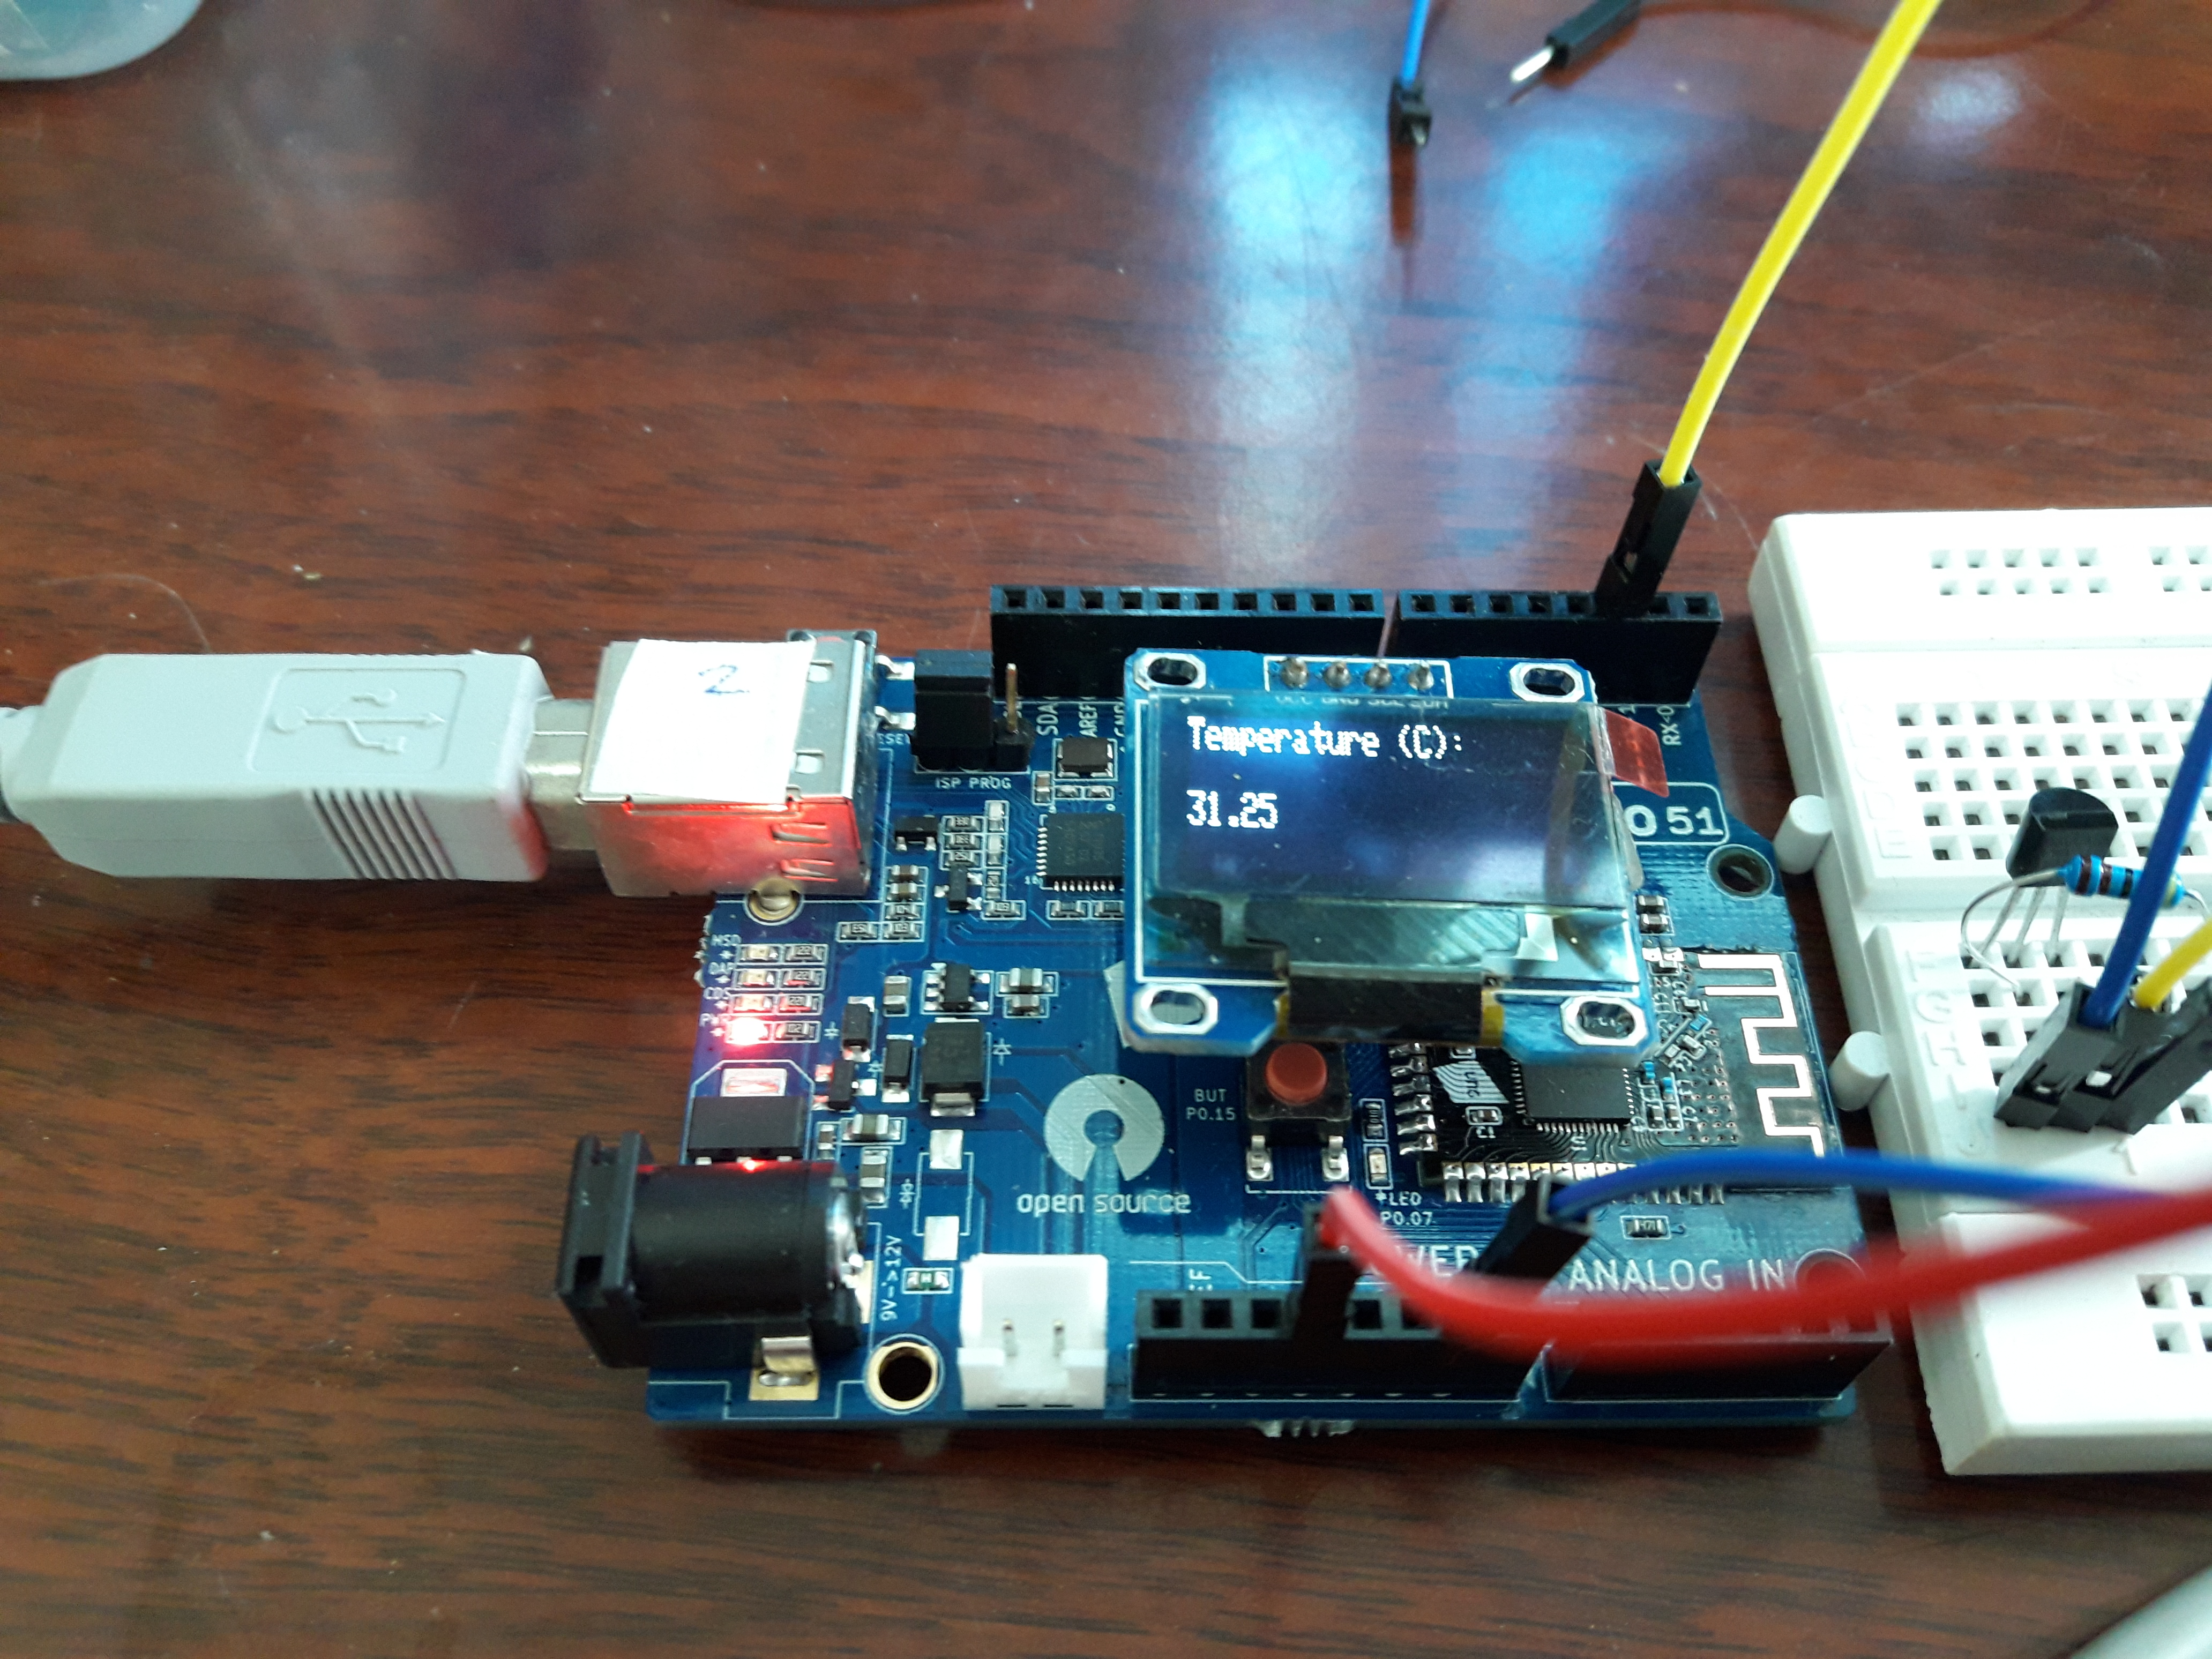
Mã nguồn Arduino dưới đây thực hiện việc đo nhiệt độ từ cảm biến nhiệt độ số DS18B20, sau đó hiển thị giá trị lên màn hình OLED I2C và gửi lên máy tính qua cổng Serial.
//Onewire sensor library
#include <OneWire.h>
#include <DallasTemperature.h>
//I2C OLED SSD1306 screen library
#include <Wire.h>
#include <Adafruit_GFX.h>
#include <Adafruit_SSD1306.h>
#define ONE_WIRE_BUS 2 // Data wire is plugged into port 2 on the Arduino
OneWire oneWire(ONE_WIRE_BUS); // Setup a oneWire instance to communicate with any OneWire devices (not just Maxim/Dallas temperature ICs)
DallasTemperature sensors(&oneWire); // Pass our oneWire reference to Dallas Temperature.
#define OLED_RESET 4
Adafruit_SSD1306 oled(OLED_RESET);
/*
* The setup function. We only start the sensors here
*/
void setup(void)
{
// start serial port
Serial.begin(115200);
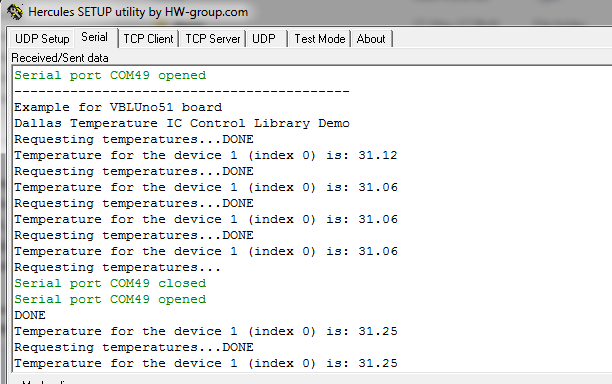
Serial.println("------------------------------------------");
Serial.println("Example for VBLUno51 board");
Serial.println("Dallas Temperature IC Control Library Demo");
//start oled
oled.begin(SSD1306_SWITCHCAPVCC, 0x3C);
oled.clearDisplay();
oled.setTextSize(1);
oled.setTextColor(WHITE);
oled.setCursor(0,0);
oled.println("VBLUno51 board:");
oled.display();
// Start up the library
sensors.begin();
delay(1000);
}
/*
* Main function, get and show the temperature
*/
double temp = 0.0f;
void loop(void)
{
// call sensors.requestTemperatures() to issue a global temperature
// request to all devices on the bus
Serial.print("Requesting temperatures...");
sensors.requestTemperatures(); // Send the command to get temperatures
Serial.println("DONE");
// After we got the temperatures, we can print them here.
// We use the function ByIndex, and as an example get the temperature from the first sensor only.
Serial.print("Temperature for the device 1 (index 0) is: ");
temp = sensors.getTempCByIndex(0);
Serial.println(temp);
oled.clearDisplay();
oled.setCursor(0,0);
oled.println("Temperature (C):\r\n");
oled.println(temp);
oled.display();
delay(1000);
}
5. Kết quả
- Xem video demo tại ĐÂY